If you are using Bitcoin and care about your privacy and security, you will need to run a node.
The Bitcoin node verifies that the payments you receive are fully confirmed, and that funds in your wallet both exist and belong to you. It also helps to validate the network as a whole and make sure the Bitcoin is legitimate.
There are many other useful things you can do with your own home server, such as run a lightning node, a tor node, or your own Electrum Private Server. This guide will tell you how.
[Subscribe to the ExpressVPN Blog newsletter for the latest developments in tech and privacy.]
Chapter 1: Preparation
Chapter 2: Set up
Bitcoind
Verify your balances, incoming transactions and the integrity of the network with a Bitcoin full node.
Install Go
Go, also known as Golang, is a programming language similar to C. We’ll need it to install LND.
Install LND
The Lightning Network Daemon (LND) is your full Lightning node. It requires Bitcoind and Go.
Zap Desktop
Zap Desktop is a wallet that makes Lightning easy to use. You can use it by itself, or plug it into your Lightning node.
Zap iOS
Zap iOS is a wallet for your iPhone or iPad. We’ll teach you how to plug it into your Lightning node.
Bitcoin over Tor
For additional privacy, we can hide our Bitcoin node behind the Tor network.
Electrum Private Server
Electrum Private Server (EPS) plugs into your Bitcoin node and helps you verify incoming transactions and use the Electrum lightweight wallet on your desktop or laptop without privacy trade-offs. We’ll set it up over Tor so you can connect to it from anywhere securely.
LNbits
We can use LNbits to vastly expand on the capabilities of our Lightning node, such as a simple point of sale, static donation QR codes or faucets to give away small amount of Bitcoin.
A simple Website
We’re going to use nginx to set up a simple website, configure it with a domain name and get a Letsencrypt HTTPS certificate.
A hidden service
We’ll also make our website part of the dark web by enabling it as a hidden service!
Jitsi Meet
Jitsi Meet is video conferencing software that you can host yourself. It’s quick to install!
Chapter 1: Preparation
1. Get familiar with the command line
This guide requires you to use the command line interface, or CLI, and an SSH client. SSH (Secure Shell) is a popular tool to “remote control” devices securely. In principle, it functions similarly to a VPN, with the exception that you gain access to a computer, rather than the entire internet.
Windows
Windows 10 has a native command line interface, though it might not be installed by default. To install it:
- Go to Settings > Apps
- Click Manage optional features under Apps & features
If an SSH client is installed on your machine it should appear here. If not, you can add it by clicking Add a Feature and then OpenSSH Client. Don’t install the OpenSSH Server.
To use the SSH client, you need to first open a PowerShell, which can be done by right-clicking the Start Menu or by pressing Windows+X and then selecting the PowerShell.
Once you have launched the PowerShell you enter SSH to be ready.
Mac OS
Open the terminal with Spotlight, the Launch Pad, or Finder.
Linux
Open the command line with Ctrl+Alt+T
Useful tips when using the command line
- Copy/paste: The standard
Ctrl+CandCtrl+Vwon’t work in the command line, but you can useCtrl+Shift+CandCtrl+Shift+Vinstead. You can also use your mouse pointer to select text and then copy/paste it by right-clicking the area that you marked. Often you can also paste content by clicking the middle-key or wheel on your mousepad or mouse. - Using the up/down arrows in your keyboards will let you browse through recently executed commands, which is very useful if all you need is to change a small typo.
- Use
Ctrl+Cto abort a command that is stuck. This will also get you out of most menus or programs. - The command line is also a bit like a one-dimensional file explorer. Use the
lscommand to see which files exist in the current folder, orcdto move to a specific directory.cd ..will move one directory down andcd ~/goes back to the home folder.

- See which drives are currently connected and how much they are used with the
df -hoption. - You can use the Tab button to autocomplete many instances, for example when selecting a folder to move into with
cd, copy withcp, move withmv, or delete withrm. Typingcd dfollowed by the Tab button will automatically complete a folder starting with d, if it exists. If there are multiple folders starting with d you can press the Tab button again to see the full list.

2. Get a Virtual Private Server
Any server will do. With little effort, you can even convert an old laptop or use a mini PC for about 100 USD. Even a computer as small as a Raspberry Pi would theoretically suffice.
In our case, we will rent a Virtual Private Server (VPS) from Lunanode. We chose Lunanode because it’s relatively easy to sign up without identification—it accepts Bitcoin—and it’s reliable. Another great alternative is Cryptohost (which even takes Lightning!). Pricier but also requiring less personal information for signup is Njal.la.
Alternatively, you may also opt for one of the larger providers such as AWS, Digital Ocean, or Rackspace.
Sign Up
To sign up to Lunanode, you’ll need to verify your email address and phone number, then select your country and choose a password. You can immediately deposit Bitcoin into your account to start paying for your server or enter a credit card to bill you automatically.
Pricing
We recommend the m2 server for 7 USD per month. For the purposes of Bitcoin mining, we’ll add 80GB of storage for an extra 2.7 USD per month.
Find your SSH key
- In Windows, use the SSH client (see above).
1. If this is your first time using the SSH client, typessh-keygen -o -b 4096 -t rsaon the command line to generate a key.
2. Once you have generated a key, or if you already have a key, find it atC:\Users\YourUserName\.ssh\id_rsa.pub
3. Open this file with your notepad and add it to your Lunanode panel - In Mac OS, open the terminal with Spotlight, Launch Pad, or Finder
1. Create an SSH key with the command:ssh-keygen -o -b 4096 -t rsa
2. You can then find your SSH key under~/.ssh/id_rsa.pub
3. Open this file with your notepad and add it to your Lunanode panel. - In Linux, open a terminal with the command:
Ctrl+Alt+T
1. Create an SSH with the command:ssh-keygen -o -b 4096 -t rsa
2. You can then find your SSH key under~/.ssh/id_rsa.pub
3. Open this file with your notepad and add it to your Lunanode panel.
Add your SSH key
In your Lunanode dashboard, find the option “SSH Keys” on the left side. Give your SSH key a name and paste the contents of your notepad in its entirety into the public key field, then click “Add SSH Keypair.” It should then appear in the list.
Launch your server
To create your virtual machine, click on “Create VM” on the top left corner of your Lunanode dashboard. Choose a location, a plan, and an operating system, then decide on a hostname. In our case, that is Toronto, m2 on Ubuntu 18.04 (64 bit) and we named it Torontola. You’ll also need to add your keypair so you can securely log in.
Get extra storage
On the left side of the Lunanode dashboard is the option ‘Volumes.’ Now select the same region that your server is in, give it a name, then set a size (we recommend at least 80GB for your Bitcoin node). As soon as you create it you can select ‘manage’ and connect it to your server under ‘Attach to VM’. We will keep the driver at its default ‘virtio.’
Log in to your server
Under “virtual machine” you should see your instance now. Click on its name and you should see, among others, its external IP address. You can log in to your server by opening up a Terminal window and entering the command:
ssh ubuntu@
for example: ssh ubuntu@192.168.1.1
Since it’s your first login, you will likely be told the authenticity of your host couldn’t be confirmed. Enter yes to add your machine to your list of trusted devices. You’ll be warned again if the key changes.
Configure your server
Set up a simple firewall to protect the server. Ufw (uncomplicated firewall) should be pre-installed on your machine. Check if it’s installed or enabled by typing sudo ufw status
If you aren’t shown a “Status” message in response, you can install it with sudo apt install ufw
More important, enable SSH to log in to our machine remotely. Skip this step if you have direct access to the server, meaning you can plug a monitor and keyboard into it. If you can’t, you must enable SSH with sudo ufw allow ssh
Now turn the firewall on with sudo ufw enable
Update your server
Make sure your server is up to date by running the commands sudo apt update and sudo apt upgrade.
Now you’re all set! The next steps describe how to set up the Bitcoin node.
***

3. Add a volume
To start, we need to get the server ready to connect to the Bitcoin network.
In your terminal, logged into your server, you can now run the command sudo fdisk -l to confirm the volume name. It’s very likely the same as ours, /dev/vdc
To permanently attach the volume to our server, become a superuser temporarily. Become a superuser by running the command: sudo -i
Our username now changes to root@torontola, and we can run the following commands without sudo:
mkfs.ext4 /dev/vdc (formats the empty drive)
mkdir /media/bitcoin (creates a mount point)
mount /dev/vdc /media/bitcoin (mounts the device at the mount point)
echo '/dev/vdc /media/bitcoin ext4 defaults 0 2' >> /etc/fstab (makes the mount point permanent)
chown -R ubuntu /media/bitcoin (allows us to later write data to this drive as the default ubuntu user)
Go back to our regular user (safer) by typing exit
Test the setup by restarting your computer with the command sudo reboot now
This will also kick you out of the server, so log back in with ssh ubuntu@< your ip here >
Run the command df -h to see if the volume is correctly attached. Pay close attention to the line that shows /dev/vdc as being mounted on /media/bitcoin

Your server is now ready to be a Bitcoin node!
Chapter 2: Set up your own Bitcoin Power Node online
Includes a full node, Lightning, Tor support, Zap Desktop and iOS wallet, ejabberd, BTCPay Server
Log in to (or stay logged in to) the server.
1. Install Bitcoind
To install Bitcoind, you first need to add the Bitcoin repository:
sudo add-apt-repository ppa:bitcoin/bitcoin
Confirm the choice, update the package manager with sudo apt update
Install Bitcoind with the command: sudo apt install bitcoind
Create a simple config file
Sync Bitcoin into our added volume, which requires a line addition to the config file. You might also want to prune it, which means limiting the size of the Blockchain by only keeping recent blocks on the disk.
Pruning allows us to save on storage space and cost. Create a bitcoin directory with the command: mkdir .bitcoin (the dot is important)
Then a config file with the command: nano ~/.bitcoin/bitcoin.conf
Now copy/paste the following into it:
datadir=/media/bitcoin
daemon=1
prune=70000
Save the file with the keys Ctrl+O and close the window with the command: Ctrl+X
Start Bitcoind
Start Bitcoind with the command bitcoind
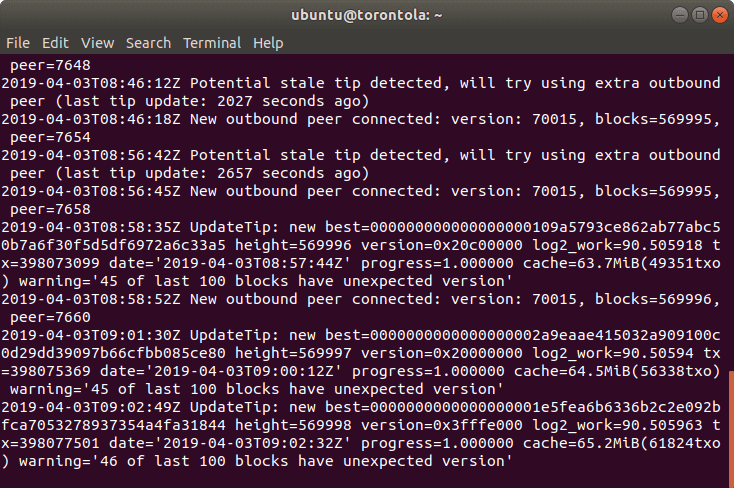
You should get the response “Bitcoin server starting.” To see what your Bitcoin node is doing you can run the command tail -f /media/bitcoin/debug.log
You can also open a new terminal window, SSH into your machine, and keep this window open if you’d like. It will give you an easy overview of everything. You can exit the window by holding the keys Ctrl+C at the same time.
Check up on your computer
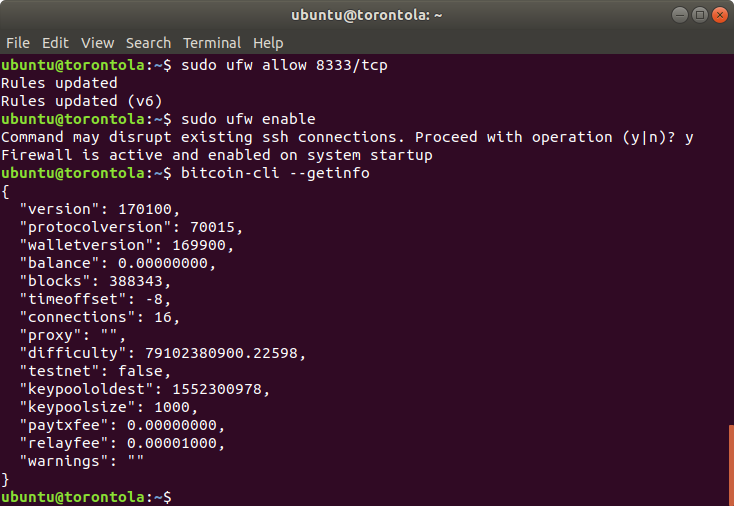
Check the health of our node also by typing bitcoin-cli --getinfo
In the example below, you can see we have synced 388,343 blocks (of ~566,000) and are connected to 16 peers.
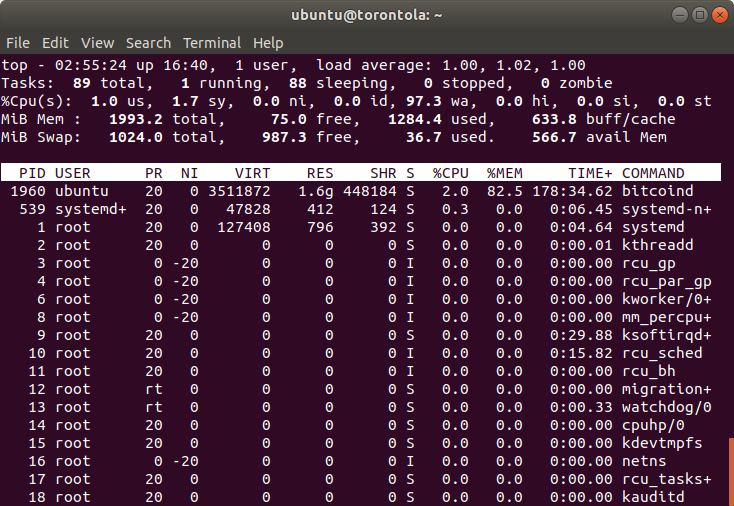
Run the command top anytime to see how many resources are being consumed. This might also be useful when seeing if a process is still running. Below we can see that Bitcoind is consuming most of our memory, but relatively little CPU.
Now… Wait
Syncing Bitcoin will take a while. It’s best to pause here and continue later. You can periodically check back on your node using the bitcoin-cli --getinfo command or by observing the logs using tail -f /media/bitcoin/debug.log
Optional: Open ports
Allow incoming connections to our future Bitcoin node with sudo ufw allow 8333/tcp
Open ports help the network as it creates more space for others to connect.
Optional: Buy extra CPU time
Syncing your node for the first time can be CPU intensive. In your Lunanode admin panel, go to “Virtual Machines,” click on your server, then on “CPU.”
Change the option from “No” to “Yes” under “Pay for CPU utilization above baseline performance?” A complete sync of a Bitcoin node should not cost more than 4 USD.
2. Download and install Go
We’re roughly following the installation guide found on the Lightning Network Github, tailored to the Lunanode instance that we already have. We’ll try to keep our guide up to date, but if you see any unexpected errors, it might be worth checking there if anything has changed.
Download Go
Download the Go code with the command: wget https://dl.google.com/go/go1.11.5.linux-amd64.tar.gz
Verify that the data is correct by typing sha256sum go1.11.5.linux-amd64.tar.gz | awk -F " " '{ print $1 }'
This shows us the SHA256 hash of the data we downloaded. We expect the output to be ff54aafedff961eb94792487e827515da683d61a5f9482f668008832631e5d25
Install Go
The file comes compressed, similar to a zip file. Unpack Go into the home directory tar -C ~/ -xzf go1.11.5.linux-amd64.tar.gz
Copy it over to a more appropriate place with sudo mv ~/go /usr/local
Next, tell the server where it can find the Go code. This may differ from machine to machine. In our case it is:
export GOROOT=/usr/local/go
export GOPATH=$HOME/go
export PATH=$GOPATH/bin:$GOROOT/bin:$PATH
To make this permanent, add the lines to .bashrc file. Open the file using nano ~/.bashrc then scroll to the bottom and paste there.
Save and close nano by pressing the buttons Ctrl+O and Ctrl+X
Check if go is properly installed
Test if Go is properly installed by typing go version
Expect the output: go version go1.11.5 linux/amd64
3. lnd
a) Install lnd
Prerequisites
Download essentials before commencing the installation.
Run the command:
sudo apt-get install -y build-essential
Make sure Git is installed. If not, install it withsudo apt install gitDownload lnd
To install lnd, download the code
go get -d github.com/lightningnetwork/lndInstall lnd
Move into the directory of lnd with the command:
cd ~/go/src/github.com/lightningnetwork/lndIt’s generally recommended to stick with the latest release, rather than updating to the latest code on master. Check what the latest release of lnd is here. In our case it’s version v0.5.2-beta. We will “check out” this version with the command
git fetch --tags
git checkout v0.5.2-betaFinally, install lnd with the command:
make && make installNow navigate back to the home folder with
cd ~/Check if lnd is properly installed
You should now be able to see if lnd is installed by typing
lnd --versionandlncli --versionIt should read
version 0.5.2-beta commit=v0.5.2-betaConfigure lnd
Create a configuration file for lnd. Make the directory with
mkdir ~/.lndEdit it right away using
nano ~/.lnd/lnd.conf
Don’t forget to fill in the blue fields with your own information! You can freely choose a name and color for your node.
Find your IP address in the dashboard of Lunanode (if that is what you are using for your server).
You’ll need a username and password for the next step. For simplicity, it might be a good idea to avoid special characters.
# [Application Options]
alias=< name of your node >
color=< your favorite color in hex ># [Bitcoin]
bitcoin.active=1
bitcoin.mainnet=1
bitcoin.node=bitcoindbitcoind.rpchost=127.0.0.1
bitcoind.rpcuser=< your username >
bitcoind.rpcpass=< your password >bitcoind.zmqpubrawblock=tcp://127.0.0.1:28332
bitcoind.zmqpubrawtx=tcp://127.0.0.1:28333# [LND]
externalip=< your ip >Configure Bitcoind
We’ll need to make some amendments to Bitcoind. We’ll open the config file with
nano ~/.bitcoin/bitcoin.confWe will need to add the following lines:
rpcuser=< your username >
rpcpassword=< your password >
zmqpubrawblock=tcp://127.0.0.1:28332
zmqpubrawtx=tcp://127.0.0.1:28333Save and close the config file with Ctrl+O and Ctrl+X and restart Bitcoind with sudo service bitcoind restart
b) Launch lnd and create a wallet
Prerequisites
To begin this step, make sure Bitcoind is fully synced and ready. Test this by running the command:
bitcoin-cli --getinfoand compare the value of blocks with a block explorer, for example, Blockstream.info.The block height displayed by the block explorer should be the same as the “blocks” output of our command. If the number shown by the block explorer is larger, the node is not yet synced.
Use
tail -f /media/bitcoin/debug.logto see the logs. This will also show when the last block was created and the sync progress. Our node will be synced up to this date.
Launch lnd
Launch lnd by typing
lndinto your terminal. Alternatively, you can also try~/go/bin/lndDoes it look like the output below? Great, everything is going according to plan. If you see an error message, make sure Bitcoin is running or go back to the step that the error message suggests is wrong. Are all the configuration files correct?

When your output looks like the one above, close lnd again by pressing the keys
Ctrl+CPermanently run lnd in the background with the command:
lnd &>/dev/null &Type
disownto make sure the task is still running, even if logged out or the terminal is closed.Optional: Observe lnd through the debug logs
Open a new terminal, SSH back into the server and open the lnd logs to get a good idea of what is going on in the background.
It’s quite interesting, but will also alert you if anything is going wrong. In the new terminal window, type:
tail -f ~/.lnd/logs/bitcoin/mainnet/lnd.logLeave this view anytime by pressing
Ctrl+CCreate a wallet
While lnd is running in the background, run the command:
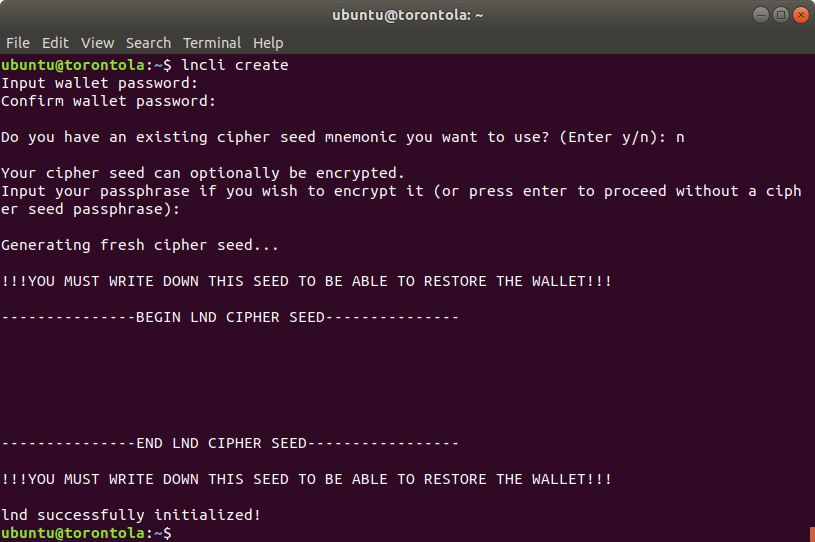
lncli createEnter a wallet password, then confirm it.
Next, we are asked whether we have an existing cipher seed mnemonic. As this is a new Lightning node (as opposed to one that is being restored), we will use
nYou can optionally encrypt your cipher seed—a good idea if you are storing the seed in a location accessible to others (under your mattress)—but you must remember the encryption key.
We choose not to encrypt the seed in this example. Below, the cipher seed is blacked out.

Unlock your wallet
If you created a new wallet, it should have unlocked automatically. If something went wrong or you are restarting lnd, you need to unlock your wallet with the command:
lncli unlockSync lnd
Since this is the first time starting lnd, we will need to sync it.
c) Open a channel
If you prefer to leave the command line at this point, jump to the next step and connect Zap Desktop or Zap iOS to your node. You can then open channels and make payments inside of a neat user interface.
Make sure lnd is running and synced
Do this with the command:
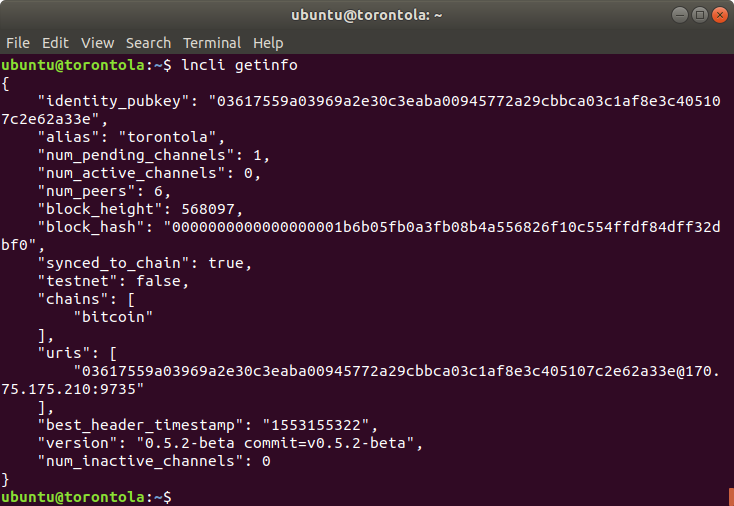
lncli getinfo. It should read synced to chain: true.If it’s not synced, we need to make sure Bitcoind is running and synced, for example, by running
bitcoin-cli --getinfoand comparing the current block height of our node with that of a block explorer.Check the logs that Bitcoind (
tail -f /media/ubuntu/bitcoin/debug.log) and lnd (tail -f ~/.lnd/lnd.log) are running.Deposit coins into your node
Generate a new address with the command:
lncli newaddress p2wkhThe output should be something like bc1…
You can now send Bitcoin to this address by copy/pasting the address into your Bitcoin wallet. If your wallet somehow cannot send to an address in the format bc1…, you can also generate a legacy address starting with ‘3’ using the command:
lncli newaddress np2wkhCheck the balance anytime by using the command:
lncli walletbalanceIt will show both the confirmed and unconfirmed balance in Satoshi. 1 Bitcoin is 100 million Satoshi.
Connect to a node
In the next step, we will connect to a node. Maybe you already have a node to connect to or know a friend running a Lightning node. You can also pick one of the popular nodes listed on 1ml.com
A Lightning node’s URI looks like this: 0331f80652fb840239df8dc99205792bba2e559a05469915804c08420230e23c7c@74.108.13.152:9735
It contains the public key of the node before the @, then its IP or domain name and the port.
Connect to this node using the command:
lncli connect [0331f80652fb840239df8dc99205792bba2e559a05469915804c08420230e23c7c@74.108.13.152:9735]When successfully connected, the output should simply be an open and a close bracket without an error message.
Open a channel
Once the deposit has been confirmed on the Bitcoin Blockchain, open a channel. You can open the channel with the node connected with the above, but it is highly recommended that you connect to a diverse group of nodes. You are also welcome to open channels with multiple nodes.
We will open a channel with the command:
lncli openchannel 0331f80652fb840239df8dc99205792bba2e559a05469915804c08420230e23c7c 200000, where the long string starting with 0331 is the other node’s public key and the number 200000 represents the amount of funds we want to put into this channel, denominated in Satoshi.Once your channel is successfully open, you will get the funding transaction. When this transaction is confirmed on the Blockchain, your channel will be open and active. Until then it will be shown under pending channels.
Generally, it will take three confirmations for your channel to become active.

Make a payment
To make a payment, you will need outgoing liquidity (have funds in channels with other nodes). To do this, all you need is to deposit Bitcoin into your node and open channels with the network.
Ideally, these channels are directly linked to the counterparties you transact with or well-connected nodes in the network.
You can always check your node with the command:
lncli getinfoYour node should always be synced to the chain, and you should have at least one active channel.
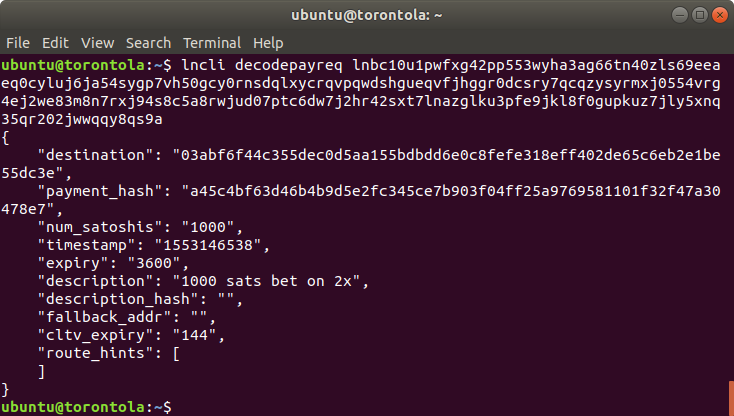
A Lightning invoice looks like this: lnbc10u1pwfxg42pp553wyha3ag66tn40zls69eeaeq0cyluj6ja54sygp7vh50gcy0rnsdqlxycrqvpqwdshgueqvfjhggr0dcsry7qcqzysyrmxj0554vrg4ej2we83m8n7rxj94s8c5a8rwjud07ptc6dw7j2hr42sxt7lnazglku3pfe9jkl8f0gupkuz7jly5xnq35qr202jwwqqy8qs9a
Decode it with the command:
lncli decodepayreq [Lightning invoice]This will show the amount, where the payment is going, and when the invoice expires.

To make a payment we will use the command:
lncli payinvoice [Lightning invoice]After confirming the amount and destination, the node will attempt to make the payment. Once the payment has been successful, information about the payment, such as the hops and fees, will be received.
Receive a payment
To receive payments, you will need incoming liquidity. Encourage others to open channels with you (over time, as your node stays online, this will happen automatically).
Every time you make a payment through your channels, you will also automatically free up incoming liquidity. For example, if you deposit 10 USD into your node, open a channel, and make a payment over 2 USD, you will immediately have 2 USD in incoming capacity.
To receive a payment, generate an invoice. The invoice follows the format
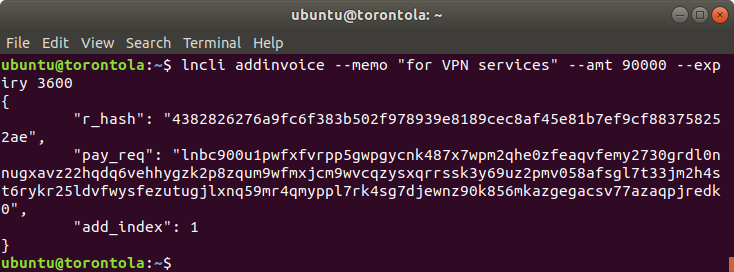
lncli addinvoice --memo “a memo” --amt --expiry < expiry time in seconds >For example, we can run
lncli addinvoice --memo “for VPN services” --amt 90000 --expiry 3600for a 90,000 Satoshi invoice that is valid for one hour.The result will include a r_hash, a pay_req and an add_index. The pay_req is our invoice that we can pass on.

Check payments
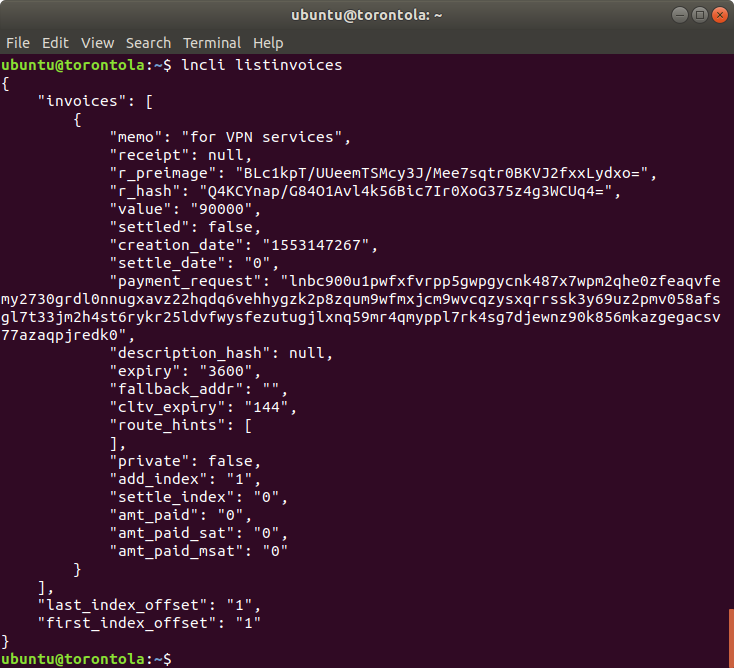
See the invoices issued and their status with the command:
lncli listinvoices. Below, we can see that the invoice we issued above has not yet been paid, as “settled” is set to false.
d) Update lnd
The Lightning network and software, like lnd, is under constant active development. New features are regularly added and bugs fixed whenever they are reported. You can report a bug yourself and check for new releases here.
To upgrade lnd, first close the application with the command
lncli stopNow navigate to your source folder, in our case:
cd ~/go/src/github.com/lightningnetwork/lndDownload the latest source code with git pull and navigate to the latest release with git checkout [latest release]. In our case that is
git checkout v0.10.1-betaTo upgrade to this release, we used the command
make clean && make && make installAfter restarting lnd with
lnd &>/dev/null &and unlocking our wallet, we can check if everything is properly updated withlncli --version. If it shows the version number of the latest release, we did everything right!e) Useful commands with lnd
By far the most useful command in lnd is
lncli help. It lists all the available commands. Get additional information on each command by adding the word “help.” For example,lncli addinvoice helpwill show you the available options when creating an invoice.lncli getinfoshows you basic information about your nodelncli listchannelsshows you the channels you currently have open and their statuslncli getnetworkinfoshows you the scope of the Lightning network from your point of viewlncli feereportshows you how much your node has earned from routing paymentslncli connectIf a payment channel is offline or inactive, you may try to connect to the peer to revive it manuallylncli walletbalanceshows you how many Satoshis you own on-chainlncli channelbalanceshows you how many Satoshis you own in channels
4. Optional: Connect Zap Desktop
Zap is a user interface for Lightning node that can run on your computer. If you are running Lightning on your local machine, it’s trivial to connect. But if your node is in the cloud, you’ll need to do a few more steps.
For this step to work, both your Bitcoind and your lnd node need to be fully synced. Check whether lnd is synced with the command:
lncli getinfo. It should read “synced to chain: true.”If they’re not synced, make sure Bitcoind is running and synced, either by checking the log with
tail -f /media/bitcoin/debug.logor by runningbitcoin-cli --getinfoand comparing the block height with another node, or by checking block explorer.Download Zap
Download Zap for desktop here. We downloaded the latest release, which in our example is v0.4.1 beta. Make sure you get the right version for your operating system! For Windows, that is
ZapDesktop-win32-v0.4.1-beta.exeAmend lnd.conf
Open our configuration file with
nano ~/.lnd/lnd.confAmend the following lines:
rpclisten=0.0.0.0:10009
tlsextraip=<your IP address>
Save and close the file withCtrl+OandCtrl+XStop lnd
To make changes go into effect, restart lnd. To stop lnd, run
lncli stop
Wait for a few seconds before starting it again. If you have the logs open, you can see when lnd has shut down. You can also check withtopDelete tls key and certificate
If you made changes to the configuration file that affect the tls key and certificate, you’ll need to delete them. Do so with the command:
rm ~/.lnd/tls.certandrm ~/.lnd/tls.keyTo start again, run
lnd &>/dev/null &anddisownOpen the firewall
To use Zap, make incoming connections to our Lightning node. Open the firewall with the command:
sudo ufw enable 10009/tcpCopy over the macaroon and TLS certificate
To authenticate the app and the server, you’ll need to copy two files (shown below).
Zap will check if the TLS key is correct to make sure it is always connected to the correct server (and not one impersonating it). To know which TLS key is right, we will need to tell Zap the TLS certificate.
Windows:
Open a new PowerShell with the command:
scp ubuntu@< your nodes ip >:~/.lnd/tls.cert C:\Users\YourUserName\Desktop\to copy the tls certificate to your desktop.Use the command:
scp ubuntu@< your nodes ip >:~/.lnd/data/chain/bitcoin/mainnet/admin.macaroon C:\Users\YourUserName\Desktop\to copy the macaroon. If you want, you may copy it into any folder using the explorer.Mac or Linux:
Open a new terminal and use the command:
scp ubuntu@< your nodes ip >:~/.lnd/tls.cert ~/Desktopto copy the tls certificate.Use the command:
scp ubuntu@< your nodes ip >:~/.lnd/data/chain/bitcoin/mainnet/admin.macaroon ~/Desktopto copy the macaroon. You can also copy it into any folder using Finder or Files.Configure Zap
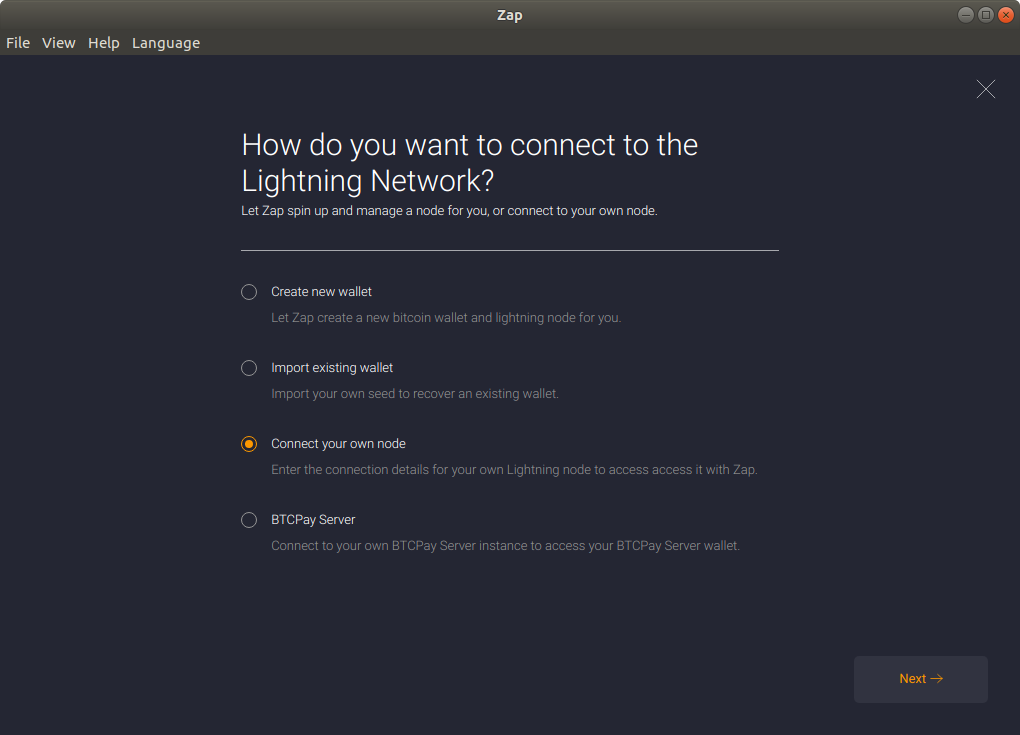
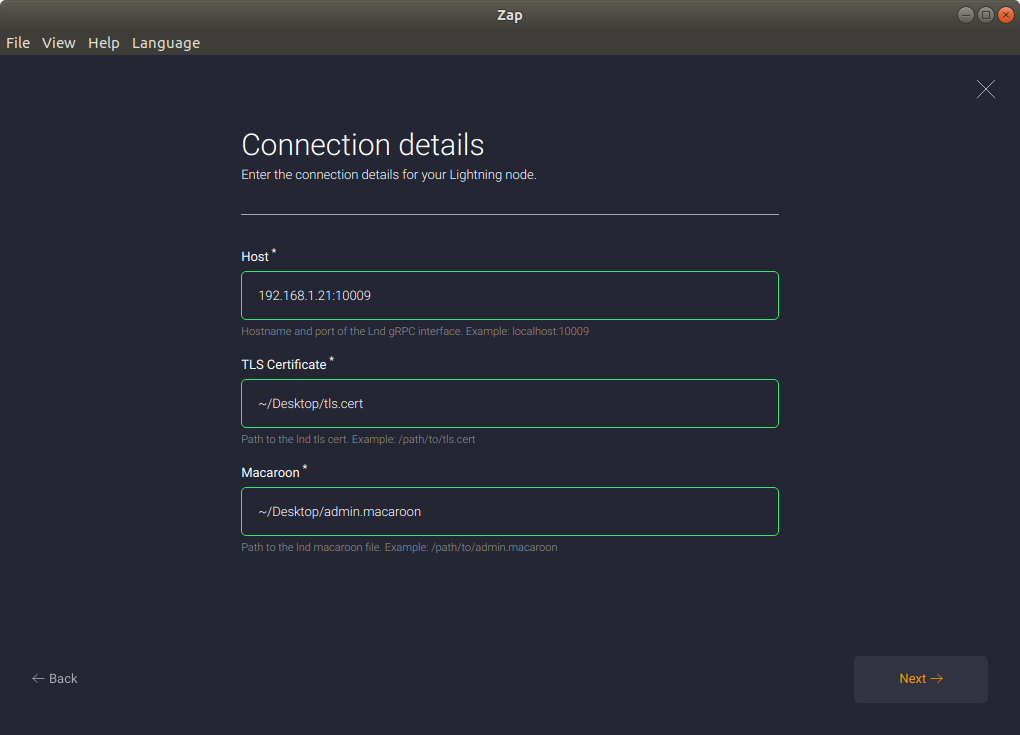
Open Zap either by clicking on the file downloaded earlier or by finding it in applications. Choose the option Connect your own node in the startup screen.

Next, enter your IP address and the path to the certificate.
Windows:
This may look like this:
192.168.1.21:10009
C:\Users\YourUserName\Desktop\tls.cert
C:\Users\YourUserName\Desktop\admin.macaroonMac or Linux:
This may look like this:
192.168.1.21:10009
~/Desktop/tls.cert
~/Desktop/admin.macaroon
Login
After clicking on Next and confirming your selection, you should be logged into your node. You can see your balance as well as your recent payments.
5. Optional: Connect Zap iOS
Zap is a user interface for your Lightning node that is still in alpha, but you can sign up to be a tester here. You can use it to connect remotely, check your funds, open channels, or make and receive payments.
Download Zap for iOS
Once you have joined as a tester, download and install the app through Testflight, Apple’s tool for downloading testing software. It will then show up as a regular app on your home screen.
Download lndconnect
To authenticate the app and the server, we’ll need to pass data from our server to the phone. When connecting Zap on the desktop, two files are copied over to our machine, but that’s not possible on a phone. Instead, use a tool called lndconnect that will generate a QR code for us.
Download lndconnect with the command:
go get -d github.com/LN-Zap/lndconnectInstall lndconnect
To install lndconnect, move into the directory with the command:
cd ~/go/src/github.com/LN-Zap/lndconnectInstall the program with
make && make installRun lndconnect
Type
lndconnectin your terminal to make the QR code appear. You may have to zoom out a bit and enlarge the window withCtrl++(Keep control pressed and additionally press the plus or minus sign to zoom in or out)Connect Zap
Open the Zap app in your phone and click Scan when given the option. Scan the QR code generated with lndconnect.
You can now see your balance, make and receive payments, and manage your channels with the app.
6. Optional: Configure Bitcoind over Tor
Privacy is great. Our Bitcoin business is solely our business, and no Internet Service Provider or government should be able to see how we use it.
But privacy is also great for security. If we can hide our Bitcoin activity, we can’t easily be targeted by criminal organizations. And, if our node can’t be found, it cannot be easily corrupted or fed false information.
Install tor
Quickly install tor with the command:
sudo apt install torConfigure tor
First, route all Bitcoin transactions through the Tor network. Then allow incoming transactions only over a hidden service.
To do this, we will need to create a password and its hash. To create a password, use your password manager (or use ours) to generate a 30+ character random password with uppercase letters, lowercase letters, and numbers.
Paste it for now in a notepad, but do not save it.
Create its hash using tor with the command:
tor --hash-password “yourpassword”Paste the output in a notepad for now.
Now edit the tor configuration file. Open it with the command:
sudo nano /etc/tor/torrcThe configuration file is already prewritten, but everything is commented out (as indicated by the lines starting with # signs. Towards the bottom of the first section, find the phrase
#ControlPort 9051Remove the # sign, so it reads
ControlPort 9051Also, remove the # signs from these two lines
HashedControlPassword < your password >
CookieAuthentication 1Replace the existing HashedControlPassword with the hash obtained in the step above. Now delete the hash from the notepad.
Save and close the new config file with
Ctrl+OandCtrl+XRestart tor with the command:
sudo service tor restartConfigure Bitcoind
Enter Bitcoin configuration file with
nano ~/.bitcoin/bitcoin.confAmend the file with the following configuration:
proxy=127.0.0.1:9050(points the Bitcoin node to the Tor Socks Proxy, so that all data goes through tor)listen=1(will listen to incoming connections)onlynet=onion(to only connect through tor)listenonion=1(will listen for incoming connections through an onion address)discover=0(so our IP address is not broadcast)torcontrol=127.0.0.1:9051(shows the bitcoin node how to control Tor, for example, to create a hidden service)torpassword=< YourTorPassword >(how the Bitcoin node will authenticate itself to the Tor node)
Paste the password created earlier, then close the notepad.
Close the editor with the commands:
Ctrl+OandCtrl+X
Restart Bitcoind with the command:sudo service bitcoind restartClose the port
Bitcoin port 8333 no longer needs to be open. Close it with the command: sudo ufw deny 8333/tcp
Test your onion setup
You can now connect to onion nodes. You should find a list of such nodes in the Bitcoin wiki.
For example, connecting to BlueMatt’s node requires the command:
bitcoin-cli addnode "nkf5e6b7pl4jfd4a.onion” addYour Bitcoin node can connect to regular IP addresses still, but only accept incoming connections via the Tor network. Your onion address will show up in your logs at startup in case you want to connect to it specifically from another node you control. You can also find it at the very bottom with the command
bitcoin-cli getnetworkinfo7. Set up Electrum Private Server over Tor
If you are using the lightweight Electrum wallet, this tool will massively improve your privacy. While fast and handy, Electrum sends your Bitcoin addresses to a remote server, which will inform you about your balance. Anybody can set up such a server, and while you can send your queries via the Tor Network, there is no guarantee or protection that these servers aren’t quietly setting up profiles about you. With your own Electrum Private Server, you do not have to worry about this.
Install Electrum on your personal computer
You can find the Electrum client here. It is recommended that you verify the PGP signatures before installing the software. Installing Electrum on your computer is not different to any other software on your personal machine.
a. Create a wallet
It is possible to set up Electrum Personal Server with your existing Electrum wallet. This will require you to resync your Bitcoin node and take considerable time, so we will first set it up with a new wallet. When you open Electrum for the first time, it will prompt you to create a wallet. We recommend to create a ‘standard wallet’ with the ‘segwit’ option. You will be given a ‘seed phrase.’ It’s important to store this seed securely, either on a piece of paper in a safe location, or in your password manager. Anybody with access to this seed can take your Bitcoin. Under no circumstances store it somewhere online, such as a note-taking app like Google Keep or your email drafts.
b. Get your Master Public Key
In the menu under “Wallet, ”click “Information” to retrieve your Master Public Key. Anybody with this access to this key can see what transactions you are making and how many Bitcoin you have, but they cannot take your Bitcoin. We will need this Master Public Key later. For now we can save it in a text editor or keep the window open.

c. Configure bitcoind
Enter your bitcoin configuration file
with nano ~/.bitcoin/bitcoin.confAmend the file with the following configuration:
server=1
 disablewallet=0
If you have been following the guide above, you already have an RPC username and password set. You can always find it again in your bitcoind configuration file, which you can open with the command
nano ~/.bitcoin/bitcoin.confand save withCtrl+Oand close withCtrl+X. Alternatively you can set any username and password in your configuration file. It will look like this:
rpcuser=< your username >
 rpcpassword=< your password >
Save and close the config file with
Ctrl+OandCtrl+Xand restart bitcoind withsudo service bitcoind restartd. Set up a dedicated wallet
Create a dedicated wallet for electrum-personal-server with the command
bitcoin-cli createwallet electrumpersonalserver truee. Download electrum-personal-server
We can find all the latest releases here. Use the source code packaged with tar.gz. In our case, the latest version is v0.2.0. Download this software to our server with the command
wget https://github.com/chris-belcher/electrum-personal-server/archive/eps-v0.2.0.tar.gzDownload the signature with
wget https://github.com/chris-belcher/electrum-personal-server/releases/download/eps-v0.2.0/eps-v0.2.0.tar.gz.ascf. Verify electrum-personal-server
First, download the PGP key of the developer, which is found here and here. Download it with the command
wget https://raw.githubusercontent.com/chris-belcher/electrum-personal-server/master/docs/pubkeys/belcher.ascImport it with the command
gpg --import belcher.asc
Verify whether the software is appropriately signed with the command
gpg --verify eps-v0.2.0.tar.gz.asc
g. Create a SSL key and certificate
To keep things organized, create a dedicated folder for all things related to electrum-personal-server with the command
mkdir ~/eps. Navigate into that folder withcd ~/epsCreate the private key with
openssl genrsa -out server.key 2048Now create a certificate with
openssl req -new -key server.key -out server.csrThe command will ask a series of questions, such as ‘Country Name’ or ‘Email Address.’ As we will not have this certificate signed by a certificate authority, we can ignore all pressing
Entereach time.Sign the certificate with the command
openssl x509 -req -days 1826 -in server.csr -signkey server.key -out server.crtIt is valid for five years. You can adjust the validity by changing the number of days in the command above.
h. Install dependencies
Unless it is already installed, install python with
sudo apt install python3-pipi. Install electrum-personal-server
Unpack the tar.gz file with the command
tar -xvzf eps-v0.2.0.tar.gzEnter the directory with
cd electrum-personal-server-eps-v0.2.0Now copy the configuration file with the command
cp config.ini_sample ~/eps/config.iniYou can open and edit the file with
nano ~/eps/config.ini- In the first section, under “master-public-keys,” enter the public key obtained above.
- If you have multiple wallets, you may add each wallet in a new line.
- In the second section, under “bitcoin-rpc,” remove the #-sign before “rpc_user” and “rpc_password” and add the details in the bitcoin.conf file.
- In the section “electrum-server,” adjust the location of the key and certificate.
certfile = eps/server.crt
keyfile = eps/server.key - Optionally, dedicate a permanent log file under “logging”, such as
log_file_location = eps/eps.log
Exit the editor withCtrl+OandCtrl+X
To install the software, go into the folder with
cd ~/electrum-personal-server-eps-v0.2.0/The folder name will depend on your version. We will install the software with
pip3 install --user .Don’t forget the dot at the end of the command!

j. Run electrum-personal-server for the first time
Run electrum-personal-server for the first time using the command
electrum-personal-server ~/eps/config.iniIf you receive the error command not found it is likely that you will also have to add the directory .local to your $PATH. Use the command
echo 'PATH=$HOME/.local/bin:$PATH' >> ~/.profileto do that. You will also have to log out and back in again using the commandexit.The first time we run electrum-personal-server it will import all the addresses from your Electrum wallet into the Bitcoind wallet. That takes about a minute.

Since we created a new, empty, Electrum wallet, we will not have to rescan the Blockchain. If you do need this step, continue reading below.
Optional: Rescan Bitcoind
If your Electrum wallet has already been set up and you do not want to move over to your new wallet, you have to rescan Bitcoind. To do that, make sure electrum-personal-server is not running, eg by looking at the log output or checking the list of running applications (except those running as root) with the command
ps -U root -u root --deselectStop Bitcoind with the command sudo service
bitcoind stopYou can restart Bitcoind with the command
bitcoind --rescanThis will take a while. Depending on whether you are running Bitcoind with pruning or not, the entire Blockchain may have to be downloaded.
k. Set up tor
To make the electrum-personal-server available from your laptop and mobile phones, set up tor. Unless tor is already installed, run
sudo apt install torto set it up.Navigate to the configuration file with the command
sudo nano /etc/tor/torrcIn the section for ‘hidden services,’add the lines:
HiddenServiceDir /var/lib/tor/eps
 HiddenServicePort 50002 127.0.0.1:50002
Restart tor with the command
sudo service tor restartTo find out the hidden service address, run the command
sudo cat /var/lib/tor/eps/hostnameFor us, the address
sih57ktjsudd2jpp.onionwill appear. Yours will be different.l. Run electrum-personal-server
Run electrum-personal-server again, but this time with the command
electrum-personal-server ~/eps/config.ini &>/dev/null &anddisownThis will make sure the program keeps running in the background, even when disconnected from the server. Watch the log output with
tail -f ~/eps/eps.logm. Install Tor on your personal machine
For this to work, you will need to set up Tor on your personal machine. You can download the Tor Browser here. You will need to keep it running in the background. Alternatively you can also install a Tor proxy directly on your machine. On your Android device, you can install Orbot.
n. Launch Electrum Client
Open your Electrum wallet on your computer and click on the round button on the bottom right.
Under ‘Proxy,’ select to use the Tor proxy at
127.0.0.1, port9050(port9051if you use the Tor Browser in the background). Under ‘Server’ enter your onion address, in our casesih57ktjsudd2jpp.onionOptional: Disable connections to other servers
To connect your Electrum client exclusively to your electrum-personal-server, edit the configuration file on your machine. You can find it here:
- Windows:
C:\Program Files (x86)\Electrum\config - Linux:
~/.electrum/config - Mac:
~/.electrum/config
Open the file with a text editor and find the line that says
“oneserver”:false, and change it to“oneserver”:true,Restart Electrum and under Network you should see you are only connected to your own server.

Congratulations! You can now conveniently send and receive Bitcoin from your Laptop or mobile phone without having to compromise on the security and privacy of your full node!
Risky: Connect without Tor
If you have trouble connecting to Electrum-private-server via Tor, you can also open your firewall with
sudo ufw enable 50002As there is no authentication process, this will allow anybody who knows the address to connect to your instance. Unlike with Tor, it is possible to scan or guess millions of IP addresses for electrum-private-server instances, and there may or may not be bugs in this software that could allow a malicious attacker to take over your machine. If you are keeping Bitcoin on your machine, for example because you are also running a Lightning node, this is not recommended at all.
8. LNbits
LNbits is software that helps us manage our Lightning balance. We can use it to greatly enhance the capabilities of our node, such as selling tickets, a simple point-of-sale terminal, static payment URLs or creating paywalls. We can also use it to keep track of our funds if more than one person uses our Lightning wallet, or if we use our Lightning wallet for more than one purpose.
LNbits does not need much space or computing power, so we can install it on the same server as our Lightning Node. We can also set it up on a separate server.
Install LNbits
To install LNbits we will first need to install python3. We can install it with
sudo apt install python3-venvWe make sure we are in our home directory by executing
cd ~/then clone the lnbits repository withgit clone https://github.com/lnbits/lnbits.gitWe can see what the latest release is by navigating to https://github.com/lnbits/lnbits/releases and looking for the highest version number at the top of the page. We get into the directory with cd lnbits and use
git checkout <version number>to install this version, e.g.git checkout 0.2.0Next we set up the python virtual environment with
python3 -m venv venvand install the requirements with./venv/bin/pip install -r requirements.txtThe LNbits configuration file is called .env There is a sample configuration file called .env.example which we can copy over with
cp .env.example .envNext we run
./venv/bin/quart assetsand./venv/bin/quartmigrate to prepare everything.At this point we can already test our installation. You can run
./venv/bin/hypercorn -k trio --bind 0.0.0.0:5000 'lnbits.app:create_app()'and navigate to your server at port 5000 to see the LNbits start page. You might have to lower your firewall with the commandsudo ufw allow 5000If you are building your node on your personal computer, you might now find LNbits at http://127.0.0.1:5000, if you are building it on a machine on your local network, the address might look like this: http://192.168.1.2:5000. If you have a domain name pointed at the server already, you might be able to navigate to it using this domain.
Get a TLS certificate and make LNbits available from the public internet
We need to make LNbits available to the open internet if we want to make use of all of its features. For that you will need a domain name, or at the least use Tor.
To make the process of serving the site smoothly over TLS, we will use Caddy. We can add the Caddy repository with
echo "deb [trusted=yes] https://apt.fury.io/caddy/ /" | sudo tee -a /etc/apt/sources.list.d/caddy-fury.listthensudo apt updateand finally to install Caddy we usesudo apt install caddyAs we install Caddy, the application is already running. We can stop it with
sudo caddy stop. We will also stop the lnbits app if it is still running withCtrl + C. We make sure we are in the lnbits folder by navigating to it withcd ~/lnbitsthen we create the configuration ‘Caddyfile’ with the commandnano Caddyfile(notice the capitalization).There only need to be two lines in this file. Replace the domain with what you intend to use. You cannot run another service on this domain, such as your personal website. Instead you can prefix it with something like lnbits. Your Caddyfile should look like this:
lnbits.ourdomain.com
 reverse_proxy 127.0.0.1:5000
We can now test the caddy server by starting it with the command
sudo caddy start. It should create the tls certificate for us and relay all requests to our LNbits installation. To test for this, we need to turn LNbits back on with./venv/bin/hypercorn -k trio --bind 0.0.0.0:5000 'lnbits.app:create_app()'When navigating to lnbits.ourdomain.com, do we see the LNbits front page? If yes, perfect. If not, we might have to wait for the DNS records to be active, or double check the configuration above, especially IP addresses and the log from caddy.
We can close LNbits and Caddy with
Ctrl + C, then restart Caddy permanently withsudo caddy startIt should now run in the background.Deploy LNbits in production
To run LNbits permanently, we want to install pipenv. We can do that with
sudo apt install pipenvIn our lnbits folder (cd ~/lnbits) we now runpipenv --python 3.8 install --devthenpipenv shelland finallypipenv install --devBefore we run LNbits, we will have to edit the configuration file. We open it with
nano .envWe changeQUART_ENV=production, we can also edit the site title or default wallet. Most importantly, we will need to select a wallet. If you already have your LND node set up as instructed above, we will chooseLNBITS_BACKEND_WALLET_CLASS=LndWalletIf you want to get started without your own node quickly, you can also sign up for one of the custodial solutions.
Connect your wallet
We will need to set the following parameters.
LND_GRPC_ENDPOINT=127.0.0.1If our LND wallet is running on the same server, we can leave this unchanged. Otherwise we will need to enter the IP address of our LND node.LND_GRPC_PORT=10009Above we set up our RPC port as 10009. You will need to enter the same number here.LND_GRPC_CERT="~/.lnd/tls.cert”Our certificate should be found here.LND_GRPC_MACAROON="~/.lnd/data/chain/bitcoin/mainnet/admin.macaroon”We can find our admin.macaroon in this directory. If we only intend to receive funds through our node we can also make use of the invoice.macaroon in the same folder, instead. However, this might greatly reduce the functionality of our LNbits instance, though it will also make it more secure.
As we are using the RPC feature, we will also need to install two additional packages. We can do this with
pipenv run pip install lndgrpcandpipenv run pip install purerpcOnce we have made all the amendments to the .env file, we can save it with
Ctrl + Oand exit withCtrl + X. We can now start our server!Start LNbits and look around
We will start the server with
pipenv run python -m lnbits &>/dev/null &and disown. Don’t forget to navigate into the ~/lnbits directory!You can now navigate to lnbits.ourdomain.com and open a wallet. You can deposit satoshis into this wallet using Zap or the command line. While the satoshi in this case won’t really move (unless you use an external Lightning wallet) they will be registered by LNbits and credited to your new ‘virtual’ wallet. You can now create various nice gimmicks, such as a static payment URL, a faucet, a point-of-sale, a event ticket registration system and other interesting things.
9. Create a simple web site
You’ll also be able to use this personal server to serve a simple web page. You can use this site to host information on how to contact you, or list your Lightning node information, or even host your personal blog.
Open the firewall a little
Allow incoming connections on port
80and443. To do that, run the commandssudo ufw allow httpandsudo ufw allow https. Check the status of the firewall with the commandsudo ufw statusInstall nginx
Install nginx to serve the web pages. Use the command
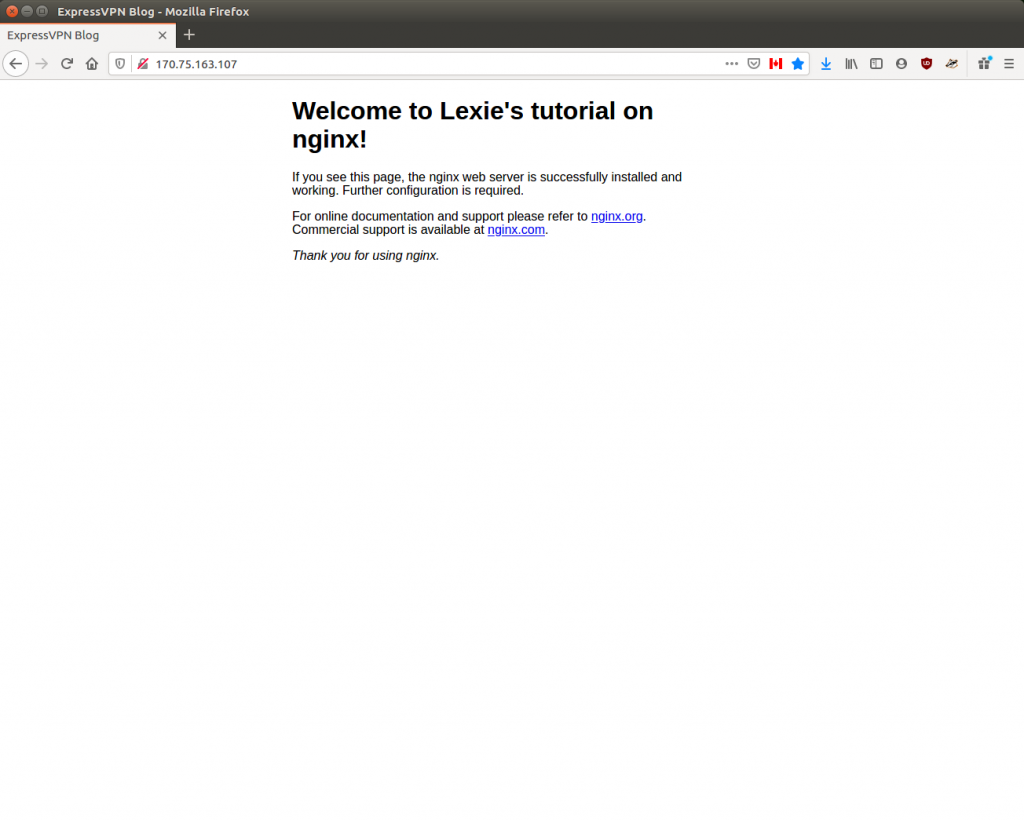
sudo apt install nginxNavigate to your site by entering the IP address of the server into a browser window. You should see the ‘Welcome to nginx’ page. Edit the page with the command
sudo nano /var/www/html/index.enginx-debian.htmland refresh your browser.

Configure a domain name
If you want your page to be easily reachable through a memorable url, you will need to purchase a domain name and set up your DNS records.
Then open the configuration file of nginx with the command
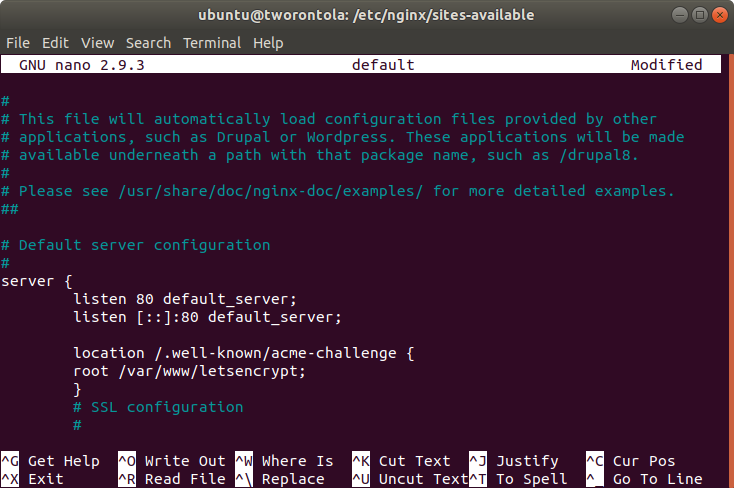
sudo nano /etc/nginx/sites-enabled/defaultLook for the line (in white) that starts with
server_nameand replace the underscore with your domain in the formatyourdomain.com www.yourdomain.com(see the example in the screenshot below).We can close the editor with the commands
Ctrl+OandCtrl+XTest changes to this configuration file with the command
sudo nginx -tThe output should read:
nginx: the configuration file /etc/nginx/nginx.conf syntax is ok
 nginx: configuration file /etc/nginx/nginx.conf test is successful
We can then reload the configuration with
sudo nginx -s reload
Get a free HTTPS certificate with Let’s Encrypt
se the Letsencrypt certbot to easily obtain a certificate. Add its repository with the command
sudo add-apt-repository ppa:certbot/certbot, then update withsudo apt updateand install the certbot withsudo apt install python-certbot-nginxObtain our certificates with the following command. (Make sure to enter your domain in the exact same format as we did above, and that your DNS records are set up correctly.)
sudo certbot --nginx -d expressvpn.com -d www.expressvpn.comEnter an email address in case there is an issue with the certificate and accept the terms of the certificate. Optionally opt into receiving information about letsencrypt from the Electronic Frontier Foundation (EFF).
We recommend HTTPS only, as there is no reason anybody should ever request any unencrypted information from your server.
10. Make your website available as a Hidden Service
You can also make your website available as a hidden service with its own onion address. If you do not want to get a domain name or reveal the IP address of your server, operate it behind a firewall, or if you want to keep its location or operator secret, run it exclusively as a hidden service.
To do this, install nginx as the steps in chapter 12, but keep your firewall closed. Do not configure your domain name and do not install letsencrypt.
Configure tor
If tor is not yet installed, install it with the command
sudo apt install torThen, navigate to the configuration file with the command
sudo nano /etc/tor/torrcFind the section ‘location-hidden services’ and remove the pound (#) sign from the following lines:
HiddenServiceDir /var/lib/tor/hidden_service/
 HiddenServicePort 80 127.0.0.1:80
Optionally, also add the line
HiddenServiceVersion 3right below theHiddenServicePortentry to obtain a longer, more secure Version 3 onion address.Now restart tor with the command
sudo service tor restartTo obtain an onion url, run the command
sudo cat /var/lib/tor/hidden_service/hostnameFor us, the output is
ufxehwtwybcu7pbw5ttzumn4hypg7excnnmmv56erbtcnakn4drva4ad.onionThe tor software will create a different onion url for each new
HiddenServiceDirwe specify. If you have not added theHiddenServiceVersionline, yours will be considerably shorter.Configure nginx
If you used letsencrypt to reconfigure nginx, you might not be able to access your server yet through your onion url. To configure it properly, open the configuration file with the command
sudo nano /etc/nginx/sites-enabled/defaultAdd the following to the bottom of the file. Make sure to replace the field with the onion url with your own onion url:
server {
 listen 80;
 listen [::]:80;
server_name ufxehwtwybcu7pbw5ttzumn4hypg7excnnmmv56erbtcnakn4drva4ad.onion;
root /var/www/html;
index index.html;
}Open the tor browser
To navigate to your onion site you will need the Tor Browser. You can get it for free here.

11. Install Jitsi Meet for private and secure video conferencing
Jitsi Meet is an open source alternative to commercial video conferencing software. Your server will be able to host calls for multiple people in multiple virtual rooms. It works in most browsers, and client apps can be downloaded from the Play and App stores.
You can do this with the server you already have, but we recommend to set up a separate instance with more computing capacity. For this installation, we will choose the s.2 for US$14 per month from the ‘General Purpose’ tab under ‘Create VM’ in Lunanode.
Once the instance is up and running, log into it with
ssh ubuntu@< your ip here >If this is the first log in, you will be asked to confirm the ECDSA key fingerprint.
Update the machine
Before you begin, make sure everything is up to date and patched with the commands
sudo apt updateandsudo apt upgradeAdd the Jitsi repository
Add the Jitsi PGP key to your machine so that we can properly authenticate software and updates. Do this with the command
wget https://download.jitsi.org/jitsi-key.gpg.key and sudo apt-key add jitsi-key.gpg.keyNow add Jitsi’s software repository to a list. First, open an editor and create a new file with
sudo nano /etc/apt/sources.list.d/jitsi-stable.listPopulate this file with
deb https://download.jitsi.org stable/Close the editor with the commands
Ctrl+OandCtrl+XUpdate the repository with
sudo apt updateConfigure the firewall
Make use of the ufw firewall. Check the current status of ufw with the command
sudo ufw statusIf it says ‘inactive,’ you will need to first allow ssh connections with
sudo ufw allow ssh, then enable the firewall withsudo ufw enableAdd the following rules:
sudo ufw allow in 80/tcp
 sudo ufw allow in 443/tcp
 sudo ufw allow in 10000:20000/udp
Get a domain name
We recommend you use jitsi with a custom domain name that you own, although it can also be operated with a raw IP address.
If you use a domain name, configure it with a name server of your choice and point it to the IP of your server. We’ll need the domain name in the next step. You won’t be able to use the same sub-domain that you use for your web server above. If you serve your website via www.domain.com, for example, you can serve Jitsi Meet via meet.domain.com. This can be configured in the DNS settings of your domain registrar.
Install Jitsi Meet
Initiate the installation process with
sudo apt install jitsi-meetYou will be asked to submit the hostname of the installation. This could be your domain name in the format domain.com, or meet.domain.com. In the next step, we will generate a self-signed certificate.

Set up the HTTPS certificate
To defend against Man-in-the-Middle Attacks, and make sure a browser can properly access our installation, set up a certificate.
Use a ready-made script for this. We will run this script in root. To get permanent root privileges, run the command
sudo -iFirst, run the scripts with
/usr/share/jitsi-meet/scripts/install-letsencrypt-cert.shEnter an email address that can be later used to provide updates. Confirm with
enterStart your first meeting
You can now navigate to your url and use your Jitsi installation! Happy video conferencing!

And much more to come…
There are plenty of other things to do with a home server. Please bookmark the page and check back as we add things and refine our processes.
If you have installed any of the tools above, congratulations! Let us know how it went, your personal configurations, and what else you are running!
FAQ: About Bitcoin nodes
Can you make money from a Bitcoin node?
No, you cannot make money from a Bitcoin node alone. While mining isn’t the only way to earn funds from the Bitcoin network, there is no monetary value that comes from running a Bitcoin node on its own. However, if you run a Bitcoin node along with a layer two protocol, like the Lightning Network, you can earn a small percentage of the transacted sum as a reward for running the node, and routing transactions.
How much does it cost to run a Bitcoin node?
There is no set cost to running a Bitcoin node. While the software for running a node is free and open source (as per the guidelines of a decentralized cryptocurrency), the main cost comes from the computer, hard drive, power supply, and internet connection you need to run a Bitcoin node.
To successfully run a Bitcoin node, you generally need 125 GB of free disk space, 2 GB of RAM, a broadband internet connection with upload speeds of at least 50 KB per second, and a connection with sufficient download limits.
While some users have managed to run a Bitcoin node with cheaper hardware when working out how much it will cost you to run a node, remember to account for the cost of higher utility bills and potentially exceeding your network usage limits.
What is the benefit of running a Bitcoin node?
Running a Bitcoin node comes with a number of benefits, despite there being no monetary reward. One of these benefits includes a heightened level of security for transactions. When you run a Bitcoin node, you contribute towards making the Bitcoin network stronger and more impenetrable—i.e., the more nodes on the network, the more secure the transactions.
Another benefit of running a Bitcoin node is privacy. For example, you need to connect to a node every time you want to transact on the Bitcoin network. If you aren’t running a Bitcoin node of your own, you would need to rely on someone else’s node to help you conduct the transaction. This could potentially put your IP information at risk. Running your own node not only ensures that your data isn’t being traced or stored anywhere, but it also verifies your transactions. This means that the payments you receive are fully confirmed and that funds in your wallet both exist and belong to you.
You can also do many other useful things with your home server, such as run a Lightning node, a Tor node, or your own Electrum Private Server. The guide above shows you how.
Should I invest in a Bitcoin node?
Yes, if you would like to preserve your privacy and bolster your security on the Bitcoin network, then it’s recommended that you invest in your own Bitcoin node. Running your own node allows you to protect your private information, as well as verify your transactions. Bitcoin also relies on nodes to verify and update the Bitcoin blockchain, ensuring it isn’t manipulated. Investing in your own Bitcoin node, therefore, means that you are actively contributing towards the Bitcoin network’s functionality and security.
Protect your online privacy and security
30-day money-back guarantee
