How to open ports on your router


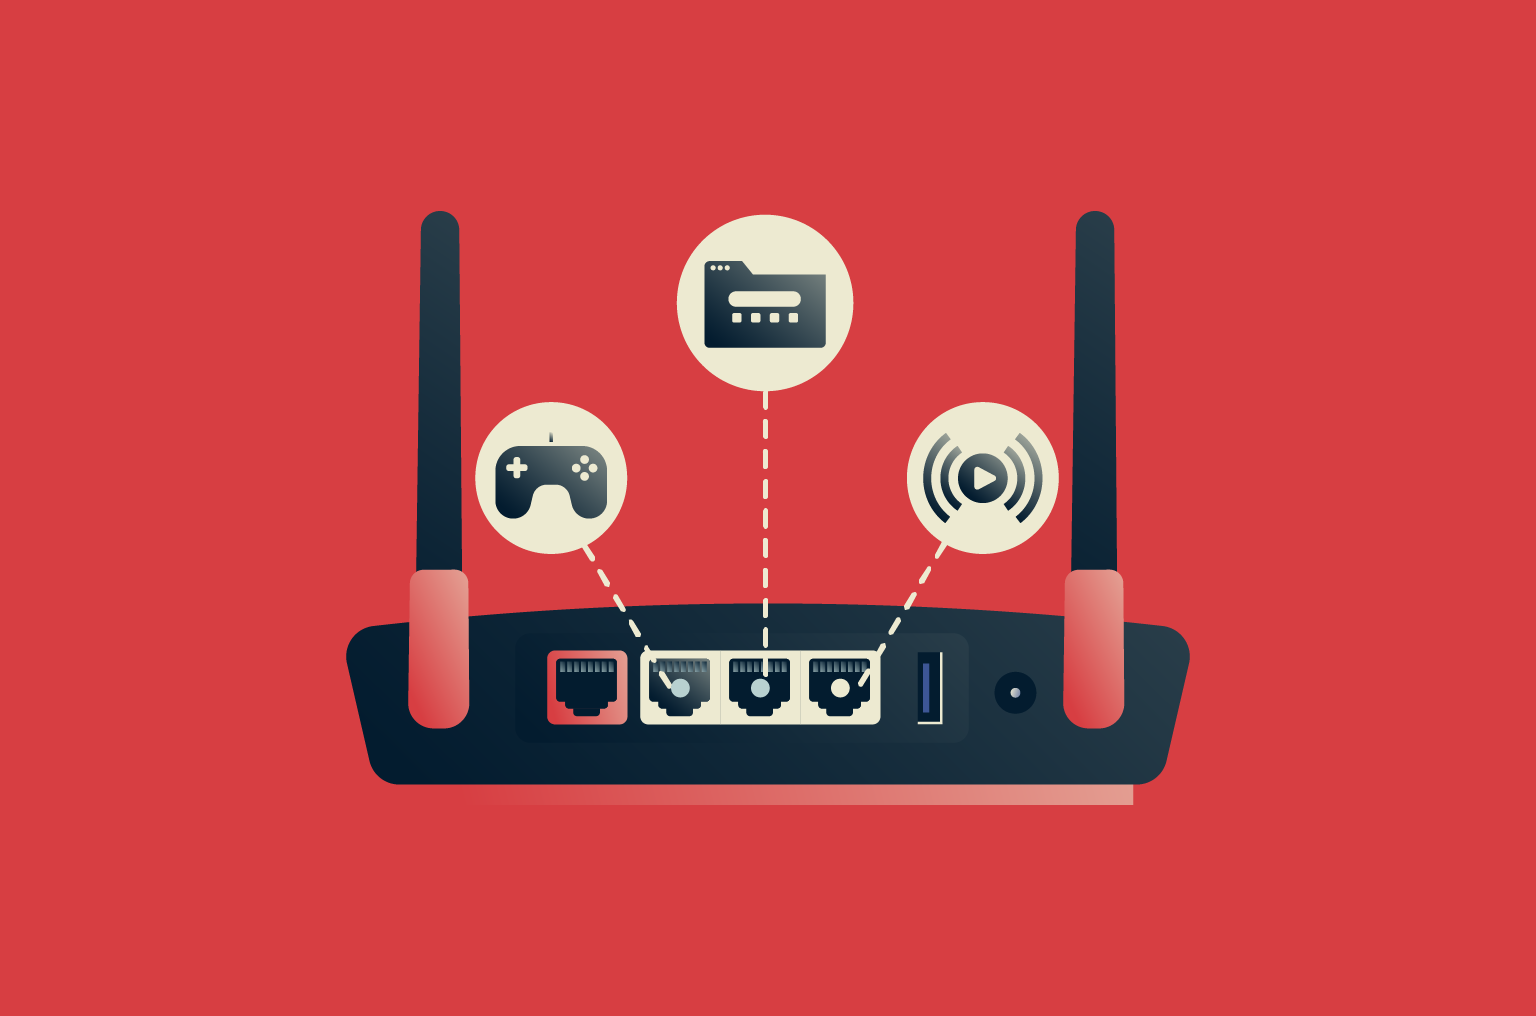
Your router controls how data moves between your home network and the internet. When you open a website, stream a movie, or play an online game, that traffic passes through numbered entry points called ports. Each service or application decides which port they’re going to use for communication between the client and server.
Most ports stay closed, which helps keep outsiders from connecting directly to your network. Sometimes though, a service needs a direct path into your network, such as an online game or a media server. In these cases, you might want to open the relevant ports manually and freely allow traffic from these services to interact with devices on your network. This guide explains how to do that safely.
Understanding ports and port forwarding
In networking, opening a port and port forwarding are closely related but not quite the same thing. Opening a port simply means allowing external traffic through that port, while port forwarding also tells the router which device in your network should receive that traffic. In home networks, both happen together, so this guide uses the terms interchangeably.
What is a port?
A port is a numbered channel that helps your device handle different kinds of internet traffic. Every connection (whether for a website, an email app, or a video call) uses a port to keep its data separate from other activity on the network.
There are 65,536 ports in total. Some are reserved for standard internet services, like 443 for HTTPS, 587 or 465 for secure email, and 53 for Domain Name System (DNS). The rest are free for apps to use as needed.
When you connect to a site, your router assigns a temporary outbound port to that connection. That number helps it track which device made the request and return data to the right place. It’s part of how Network Address Translation (NAT) works (the process that lets multiple devices share one internet connection without mixing up their traffic).
Why open ports?
Routers block unexpected traffic from the internet by design. Thanks to NAT, outside connections can only see the router’s public address, not the individual devices in your network. This keeps outside devices from reaching your network unless you allow it, but it also prevents certain devices from being directly connected to.
Port forwarding changes that behavior, creating a rule that allows external data on a chosen port to reach a particular device inside your network. This is what makes it possible to host services yourself (like small websites, file-sharing tools, or remote-access apps), as well as allowing direct connections to specific external services.
Some routers can handle this automatically through Universal Plug and Play (UPnP), which lets certain apps briefly open and close ports on their own. Many online games, chat apps, and peer-to-peer (P2P) tools use it to connect video game players or share files without extra setup.
If UPnP doesn’t work, or if you’ve disabled it for security reasons, you can open ports manually through port forwarding. This tells the router, “When data arrives on this port, send it to this specific device.” It’s what allows a game console to host multiplayer matches, a computer to share a media library, or a camera system to be viewed remotely, for example.
Security risks of port forwarding
Opening a port means that a piece of your network is out in the open. Scanners and bots sweep the internet nonstop, looking for open ports to test. If they land on yours and the service behind it isn’t protected, it can be exploited.
Here’s what can happen:
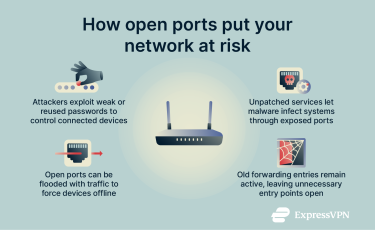
- Unauthorized access: Attackers often probe common ports to see what services are running. This could be a login page for a camera system or file server, for example. If that page is open to the internet and the password is compromised, it can give them full control of the device.
- Malware spread: Attackers and automated tools often scan for open ports linked to outdated or unpatched services. Exposed systems can be infected or used to deliver malware.
- Denial-of-service (DoS) attacks: Game servers and home hosts can be flooded with malicious traffic aimed at their open port, knocking them offline.
- Forgotten rules: People open a port for one project, leave it as is, and months later forget it’s there, posing a security risk.
How to set up a static IP address (and why you need it)
Most routers rely on the Dynamic Host Configuration Protocol (DHCP) to give each device a temporary local address, like 192.168.0.101 or 192.168.1.105. These addresses change whenever the router reboots or the device reconnects. If your port-forwarding rule points to an old address, incoming data won’t reach the target.
Setting a static IP solves this problem by locking that address in place so the router always sends traffic to the same device. There are two ways to do it: setting it on your router or setting it on the device itself.
How to find your router’s IP address and set a static IP
To access the router’s web interface, you’ll need its internal IP. Most routers use 192.168.1.1, 192.168.0.1, or 10.0.0.1, but here’s how to confirm:
- Windows: Open Command Prompt and type ipconfig, then hit the Enter key. The Default Gateway line shows your router’s IP.
- macOS: Open Terminal, type netstat -nr | grep default, then press the Enter key.
- Linux: In the Terminal, type ip route | grep default and press Enter.
You may also be able to find this information on a sticker on the router or within the manufacturer’s manual.
When logging in, type the address directly in your browser’s bar (for example, http://192.168.1.1). Some browsers try to enforce HTTPS by default, which might prevent the login page from loading. If this happens, you can switch to HTTP by typing “http://” into the browser bar instead of “https://.” Your browser might issue a warning and offer you an Advanced option that says “Proceed to site” or similar. If you don’t get this option, you can temporarily disable HTTPS-only mode in your settings, but remember to re-enable it afterwards.
Once you’re in, look for a feature named “DHCP reservation,” “address reservation,” or “static lease.” While the name differs, this feature links the device’s Media Access Control (MAC) address to a fixed IP address in your DHCP range. Enable this feature if it’s not already on, select the device for which you want a static IP, and choose “Add DHCP reservation” or similar. You’ll typically need to enter the device’s MAC address and the IP you want it to receive, and the router will then always assign that same IP to the device.
Note: You can typically find the MAC address of a device in its settings or through the command-line interface. The last section in this guide covers how to find the MAC address of common devices.
Setting up a static IP manually on various devices
You might find this the best option if you can’t access your router settings or if your router doesn’t allow DHCP reservations, for example.
Note that you should choose an IP address that fits your local range but isn’t already in use. You can check this by looking at your device’s current IP and subnet mask; avoid choosing an address inside your router’s automatic DHCP pool (which often starts around .100).
Note that, when setting a static IP, you’ll need to enter a few details manually:
- Subnet mask, usually 255.255.255.0.
- Default gateway, which is your router’s IP address.
- DNS server, which can be your router’s IP or a public DNS such as 8.8.8.8.
Windows 11
- Go to Settings > Network & Internet and choose your Wi-Fi or Ethernet connection.
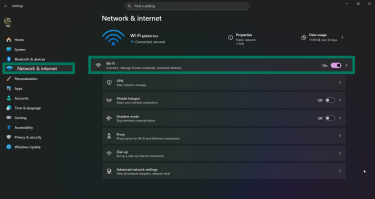
- Choose <network name> properties, then click Edit next to IP assignment. If you’re on a wired connection, you can click your Ethernet network instead to reach the same settings page.

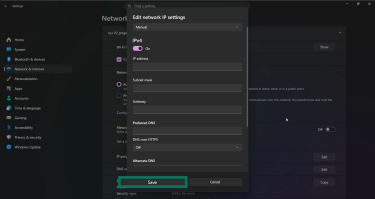
- Select Manual, turn on IPv4, and enter the IP you’ve chosen, subnet mask, gateway, and DNS. Click Save when done.
macOS
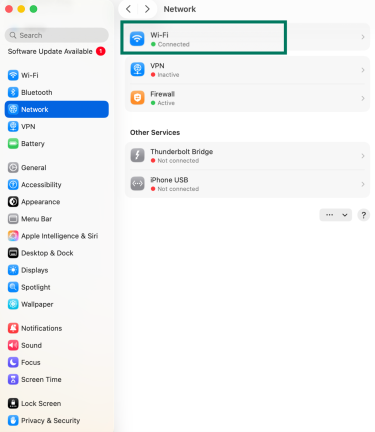
- Go to System Settings > Network. You’ll see a list of available connection types, such as Wi-Fi, Ethernet, or Thunderbolt Bridge. Select the one you’re currently using.
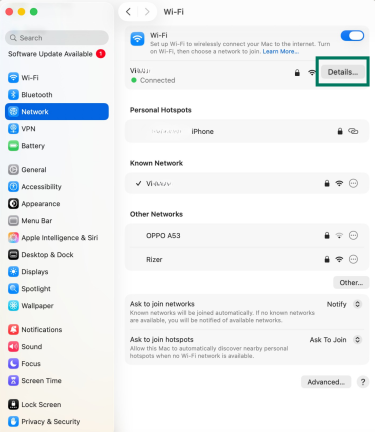
- Under your active connection, choose the network you’re connected to, then click Details.
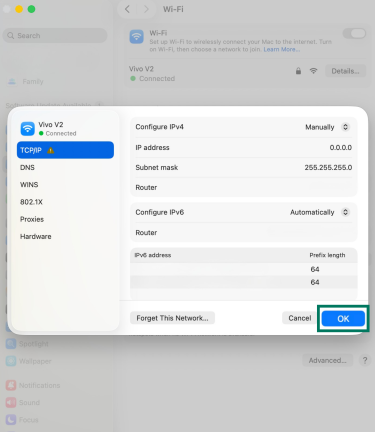
- In the TCP/IP tab, set Configure IPv4 to Manually and enter your IP address, subnet mask, and router address. Click OK to save the settings. Note that you can leave the DNS settings blank unless your network doesn’t provide DNS addresses automatically or you prefer to use specific ones.
Linux
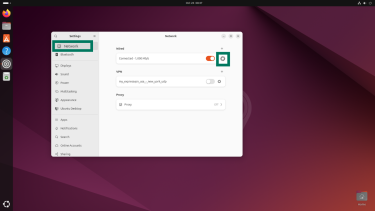
- Open your system’s network settings (for example, Settings > Network on GNOME), choose your wired or Wi-Fi connection, and click the gear icon.
- Under the IPv4 tab, change IPv4 Method to Manual, then enter the IP, subnet mask, gateway, and DNS values. Click Apply to save.
On servers without a desktop interface, use the nmcli command or edit your network configuration file (such as a Netplan or systemd-networkd config) to set the same details.
Step-by-step: How to open ports on a router
First, confirm your device is using the static IP you’ve set. You can verify this in your router’s DHCP client list or in your device’s network settings. If everything looks good, you’re ready to port forward.
The process for port forwarding varies slightly by router brand, but most follow the same pattern. These instructions will walk you through the process. First, access your router’s dashboard as described in the section above.
Navigate to the port forwarding section
After you log in, look for a menu labeled Port Forwarding, Port Range Forwarding, Virtual Servers, or Port mapping on router. All of these refer to the same thing.
Some routers place these settings under NAT, Advanced Setup, or Firewall, while others group them under headings like Applications, Gaming, or WAN. If you don’t see a port forwarding option directly on the main page, explore your router’s Advanced or Network menus.
Add a port forwarding rule
Once you’ve found the relevant settings, you can begin to enable port forwarding. The process is typically the same for most routers. Each rule you set will tell your router which incoming traffic to forward and where to send it. You’ll typically fill out:
- Service Name or Description: A label for your reference, such as “Minecraft Server” or “Camera Feed.”
- External Port: The port on your router that will accept incoming connections (for example, 25565 for Minecraft). Most apps and services that require port forwarding will specify which port(s) they use, so you can check their official documentation or support pages.
- Internal Port: Usually the same as the external port. You can enter the port number your device or application uses internally if it’s different, but if you’re unsure, leave it the same as the external port, as this works for most applications.
- Protocol: Choose TCP, UDP, or Both (TCP/UDP) depending on what the app requires. Most web or file-based services use the Transmission Control Protocol (TCP), while some games or streaming apps use the User Datagram Protocol (UDP) or both. To find the correct protocol, check the app’s official documentation or support site; if you’re unsure, you can usually select Both (TCP/UDP) without it causing issues.
- Internal IP Address: Enter the static IP you assigned to the device earlier. Some routers offer a dropdown list of connected devices, so you may not have to enter this address manually.
- Enable or Activate: Make sure this option is turned on; otherwise, the rule won’t take effect. Click Save or Apply when done.
For router-specific port forwarding guides, check out this post.
How to check if ports are open
Once you’ve added a port forwarding rule, you should check it’s working. There are two simple ways to do it: directly from your computer or through an online checker.
Using command line
Windows
- Open PowerShell.
- Type Test-NetConnection [your public IP] -Port [port number] and press Enter.
For example: Test-NetConnection 203.0.113.15 -Port 8080 - If you see TcpTestSucceeded: True, the port is open and responding.
macOS or Linux
- Open Terminal.
- Type nc -zv [your public IP] [port number] and hit Enter. Example: nc -zv 203.0.113.15 8080.
- If the port is reachable, you’ll usually see a message like: “Connection to 203.0.113.15 8080 port [tcp/someService] succeeded!”
Always test with your public IP (which you can find using ExpressVPN’s IP address tool), not your local one; otherwise, you’re just checking your internal network.
Using online port checkers
You can also test from outside your network. Sites like Canyouseeme.org, YouGetSignal, and Port Checker will show if a port is open or closed. They’ll detect your public IP automatically; you just enter the port number.
Make sure the app or device using that port is active while you test. If it isn’t running, the tool will show the port as closed even if your router rule is correct.
Troubleshooting closed ports
If a test shows your port as closed when it should be open, try these fixes:
- Router and modem setup: If you have both a modem provided by your internet service provider (ISP) and a Wi-Fi router, you’ll need to forward the same port on both devices. On your ISP modem, the forwarded internal IP address should be that of your Wi-Fi router; on the router, the forwarded internal IP address should be that of your device. Alternatively, set the modem to bridge mode so only one router handles forwarding.
- Firewall settings: Your computer or device firewall could be blocking the port. Temporarily disable the firewall to test. If you see messages like “No Internet, secured,” it might mean your device’s local network permissions are misconfigured.
- Incorrect IP: Confirm that the port rule is assigned to the correct device IP. If the device’s IP changed, update the rule in your router settings.
- ISP restrictions: Some ISPs block incoming connections on certain ports, like 25. Try a different port or contact your ISP.
- Carrier-grade NAT (CGNAT): If your router’s wide area network (WAN) IP starts with 100.64.x.x, your ISP is using CGNAT, and multiple customers share the same public IP. This makes traditional port forwarding impossible, because you can’t route connections directly to devices on your network. To use port forwarding, you can get your ISP to assign you a unique (dedicated) public IP address or use a virtual private network (VPN) that supports port forwarding, though we don’t recommend the latter method.
Specific use cases for port forwarding
Port forwarding isn’t only for hosting big web servers. It also comes up in ordinary setups (gaming consoles, remote desktops, or small self-hosted tools) that need a clear path through the router.
Opening ports for gaming
Many online games rely on fixed, well-known ports to communicate with game servers or connect players directly. When those ports stay closed, you’ll often run into lag or failed matchmaking. Forwarding allows a more stable and direct link between your console or PC and the game network.
Always check your game’s official support page or documentation before setting up new rules. Port numbers can change with updates or differ across platforms, and using outdated ones might stop the connection from working.
Opening port 443
Port 443 is the standard port for HTTPS traffic. If you’re hosting a web interface or app inside your home network that already uses HTTPS (such as a network-attached-storage or NAS dashboard or a self-hosted site) you’ll need to forward the port that service uses so it can be reached from outside your network.
If the service uses the default HTTPS port (443), you won’t need to include a port number in the URL (for example, https://myhome.ddns.net). If the service uses a non-default HTTPS port, you’ll need to include the port number (for example, https://myhome.ddns.net:8443).
Safer alternatives to port forwarding
If you only need remote access to a device from outside your home network, these options are safer and easier to manage:
- UPnP: This lets compatible apps open and close ports automatically when needed. Most routers close them again afterward. Older or poorly configured routers have exposed UPnP controls to the internet in the past, so keep your firmware updated and use it only on trusted networks.
- Cloud or relay connections: Some modern apps and devices can connect securely without opening ports. For example, Plex (a media-server app) and Synology NAS devices use encrypted relay servers to link your home system to your account on the cloud. You can stream or access files remotely without exposing your network to direct inbound traffic.
- Zero-trust remote access: Uses a “never trust, always verify” model to authenticate each session individually and route traffic through encrypted tunnels. Unlike port forwarding, it doesn’t expose any open ports to the internet; access is granted only to verified users.
VPNs and port forwarding
While many users still rely on port forwarding, there are now safer options for remote access.
Secure home network access with a remote-access VPN
If you need to connect to your home devices from outside your network, a remote-access VPN is a safer alternative to traditional port forwarding.
Instead of opening multiple ports to the internet, you only expose one secure port, typically using protocols like WireGuard, OpenVPN, or Internet Protocol Security (IPSec). All your traffic then travels through an encrypted tunnel to your home network.
Note: A remote-access VPN is a VPN you host yourself on your router or NAS. Consumer VPNs like ExpressVPN don’t provide secure access to your home network; they encrypt outbound traffic from your devices instead.
Consumer VPNs that allow port forwarding (and why it’s risky)
As mentioned above, some ISPs use CGNAT, which assigns the same public IP address to many customers. In those cases, incoming traffic from the internet never reaches your router, so regular port forwarding won’t work.
A consumer VPN could work around this by routing your connection through its own network, assigning you a public IP address that supports inbound traffic. Some VPNs do allow limited port forwarding inside the encrypted tunnel, which can make some self-hosted services reachable.
However, this creates privacy and security risks because allowing inbound connections means exposing your device or service to the internet. That’s why ExpressVPN doesn’t support port forwarding: it can increase security risks and reduce overall privacy protection. You can set up port forwarding on a router running ExpressVPN, but this traffic will go outside of the encrypted tunnel and will not be protected by your VPN connection.
FAQ: Common questions about opening ports
How do I open port 443?
Forward Transmission Control Protocol (TCP) port 443 to the internal device running your HTTPS or secure web service. If your internet service provider (ISP) blocks it, use another external port (like 8443) and map it to 443 internally.
Do I need to open ports if I use a VPN?
Usually not. A VPN creates a secure, encrypted tunnel for your internet traffic, so you don’t need to open ports yourself. Some VPNs allow selective port forwarding inside the encrypted tunnel, but this is only needed for specific use cases like running certain peer-to-peer (P2P) apps.
Is it safe to open ports?
Only if they’re secured. Limit access with firewalls, use secure protocols, keep software updated, and monitor connections.
Can I revert changes after opening a port?
Yes. Just return to your router’s port forwarding settings and delete or disable the rule. The router will stop forwarding the traffic.
Take the first step to protect yourself online. Try ExpressVPN risk-free.
Get ExpressVPN